How to connect CheckInSecure to SES.Hospedajes
Step-by-step guide with official screenshots from Spain's Ministry of the Interior. Open only the section you need.
Don't mix up the SES credentials. CheckInSecure only needs the ones in point D.
- A · Initial registration. Only if you haven't registered your entity or property yet. It requires a digital certificate or Cl@ve (section 1).
- B · Access to the registration panel. To see “Mis datos” and “Credenciales”, where your codes and your Web Service username are. You sign in from “Acceso al registro de establecimientos y entidades” with Cl@ve (Móvil or permanente) or DNIe / electronic certificate.
- C · “Sin certificado” access. Document number and platform password, which SES provides when registration is completed. It's used to look up and send communications by hand. Sign-in screen ↗
- D · Web Service. Their own username and password, which can be different from the ones above. They are the only ones CheckInSecure asks for.
Guide sections
Tap a question to see the procedure. Only one section is shown at a time.
I'm new: how do I register with SES.Hospedajes?
Go to the official SES.Hospedajes registration ↗
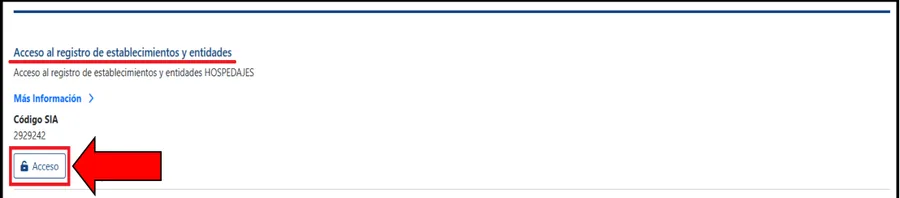
This opens the “Hospedajes y alquiler de vehículos” page of the Ministry of the Interior's Electronic Office. Under “Acceso al registro de establecimientos y entidades” click “Acceso”. Registration requires electronic identification (digital certificate or Cl@ve): see step 2.
Registration has three separate parts: identifying yourself, registering the entity (the landlord) and registering the establishment (your property). The access account isn't created at the start: according to the Electronic Office, when registration is completed SES gives you the application access credentials and the Web Service ones.
This section follows sections 1 and 2 of the official Visual Guide (v. 29.08.25) and the “Información hospedajes” page of the Electronic Office. Where the guide doesn't show a screen, we say so.
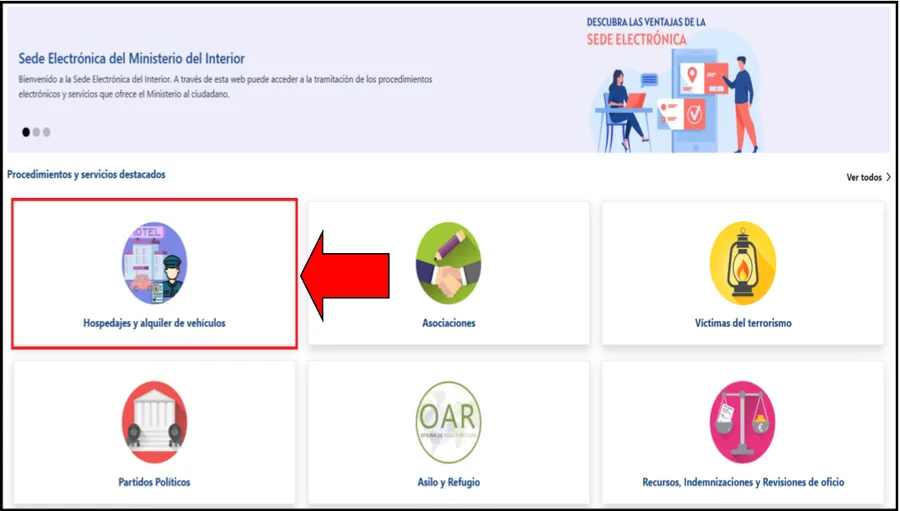
- Go to the registration. If you start from the Ministry of the Interior's Electronic Office home page, choose “Hospedajes y alquiler de vehículos”. Under “Acceso al registro de establecimientos y entidades” click “Acceso”.
 Tap to enlarge (opens in a new tab)
 Tap to enlarge (opens in a new tab)
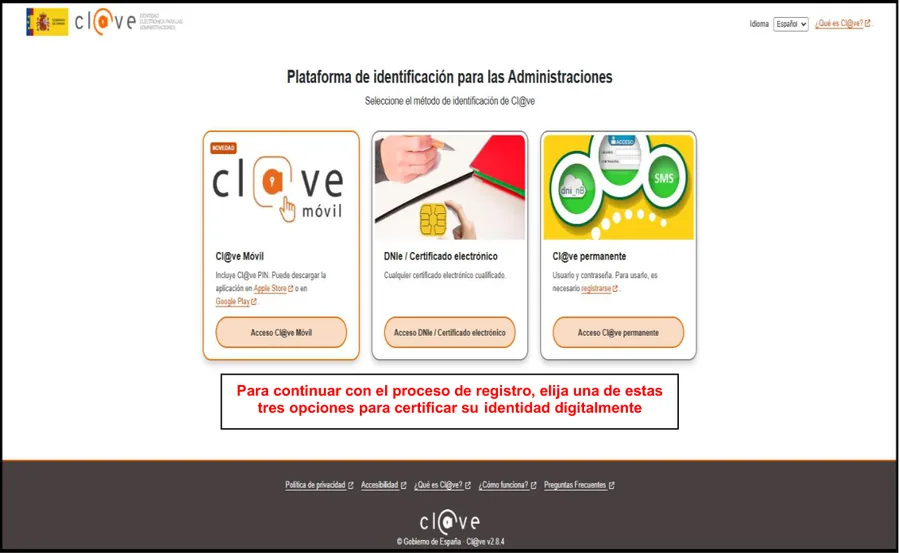
 - Identify yourself digitally. Registration requires a digital certificate or being registered in Cl@ve. The Cl@ve screen offers three methods: Cl@ve Móvil, DNIe / electronic certificate and Cl@ve permanente (username and password; you must register with Cl@ve first). Pick the one you have.
To sign the application at the end, the Electronic Office says you need to be registered in Cl@ve-Firma or have Autofirma installed (for local certificates).
How to register with Cl@ve · Download Autofirma
If you use a Mac, the official guide has a specific section on registering on Mac (section 15).
 Tap to enlarge (opens in a new tab)
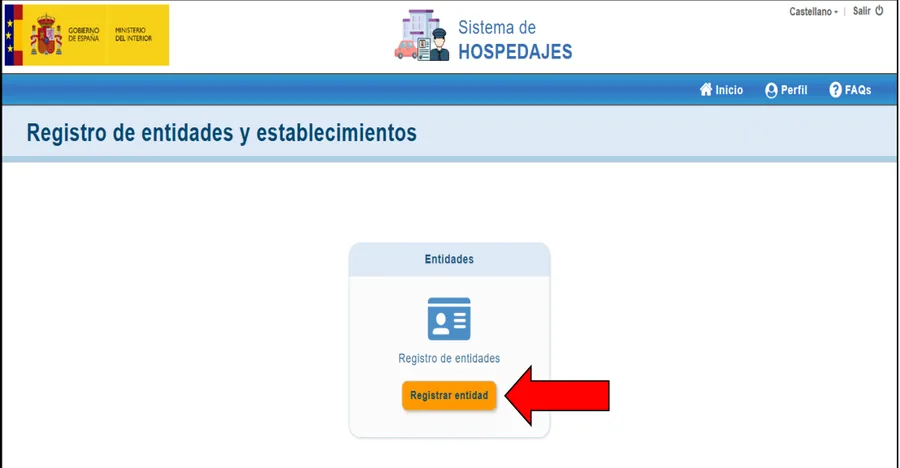
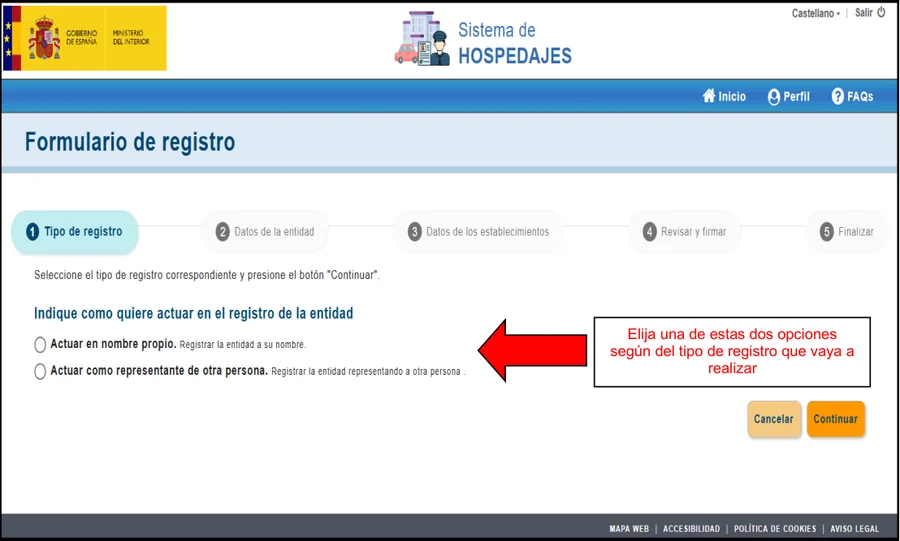
 - Register the entity (the landlord). In “Registro de entidades y establecimientos” click “Registrar entidad”. First choose how you act: “Actuar en nombre propio” or “Actuar como representante de otra persona”. The form has 5 steps: Tipo de registro, Datos de la entidad, Datos de los establecimientos, Revisar y firmar and Finalizar.
The official guide doesn't show the “Datos de la entidad” or “Revisar y firmar” screens: fill in what SES asks for and sign.
 Tap to enlarge (opens in a new tab)
 Tap to enlarge (opens in a new tab)
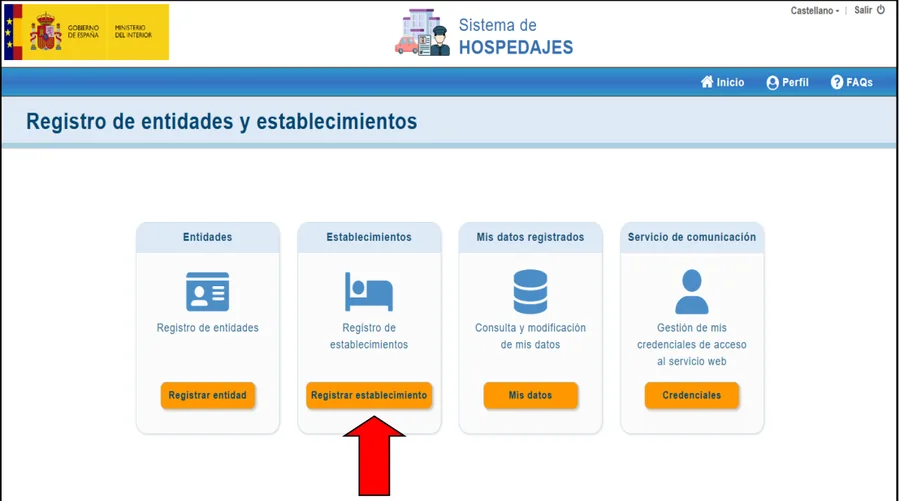
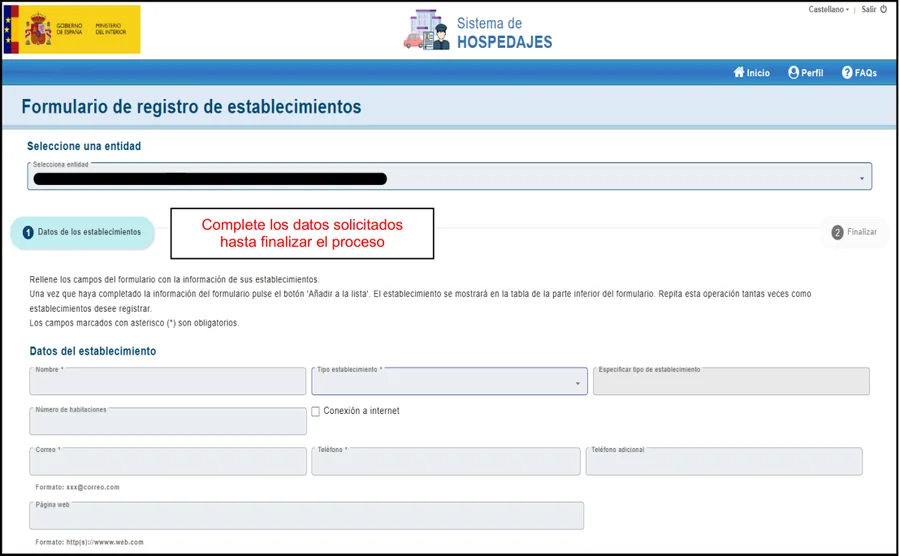
 - Register the establishment (your property). You can add it in the “Datos de los establecimientos” step of the registration itself, or later from the panel with “Registrar establecimiento” (for example, for a new property). In this form: choose the entity, fill in the required fields (*: name, establishment type, email and phone), click “Añadir a la lista” (repeat for each property) and finish.
 Tap to enlarge (opens in a new tab)
 Tap to enlarge (opens in a new tab)
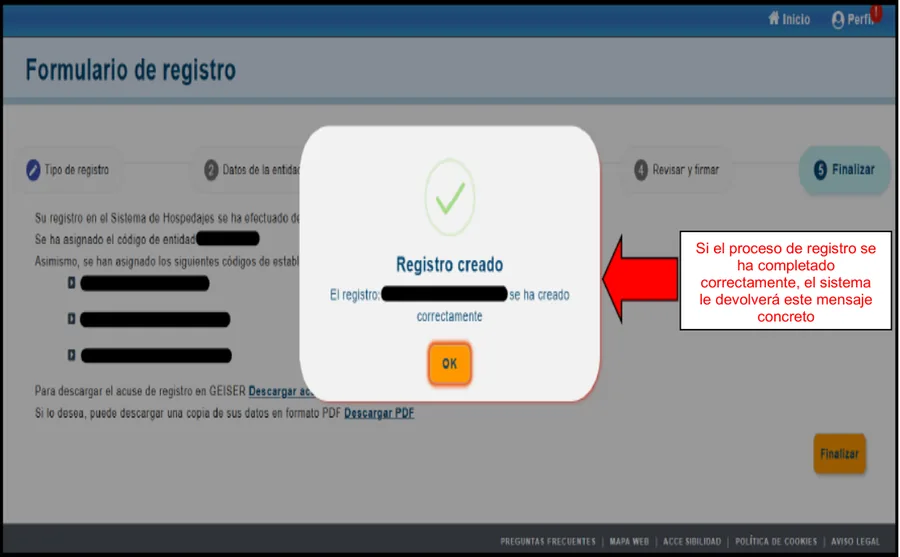
 - Finish and keep the codes. SES shows “Registro creado” with the entity code and the assigned establishment codes, and lets you download the registration receipt (GEISER) and a PDF copy. Note them down. Then compare the entity code with the “Código” field in “Mis datos” (see “Where do I find my landlord code?”): that is the screen the official guide uses to look up that code.
 Tap to enlarge (opens in a new tab)
Can the Web Service be enabled during registration? We can't confirm it: the official guide shows no option for it in the registration and doesn't explain how the credentials are delivered. What is verified is that, once the entity is registered, the “Envío de comunicaciones por servicio web” checkbox appears in “Mis datos” (see “How do I enable automatic sending through the Web Service?”) and that the Web Service username is looked up, and its password changed, in “Credenciales”.
How to sign in again later. Later, to look up your data, use the same access (the button above) and identify yourself the same way: the panel shows four cards (Entidades, Establecimientos, Mis datos registrados and Servicio de comunicación). The data CheckInSecure needs is there; each following section explains how to sign in and what to copy.
How do I enable automatic sending through the Web Service?
How to sign in. Open the official access, click “Acceso” under “Acceso al registro de establecimientos y entidades” and identify yourself with Cl@ve (Móvil or permanente) or DNIe / electronic certificate. This is not the “sin certificado” access, nor the Web Service password.
Go to the official access ↗ · Haven't registered yet? Go to “I'm new”
- In the panel, click “Mis datos”.
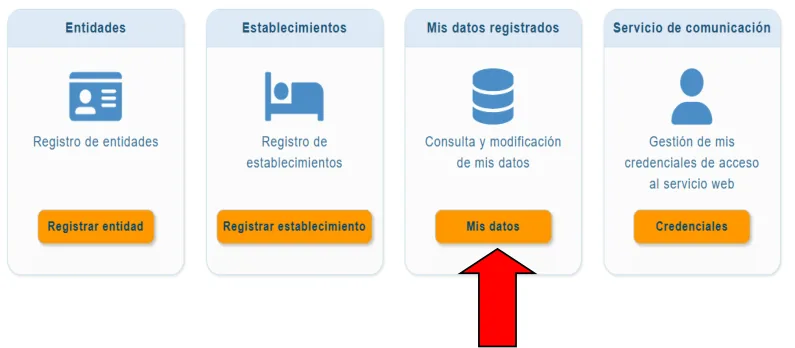 Tap to enlarge (opens in a new tab)
 - Under “Datos de la empresa”, check that the “Envío de comunicaciones por servicio web” checkbox is ticked.
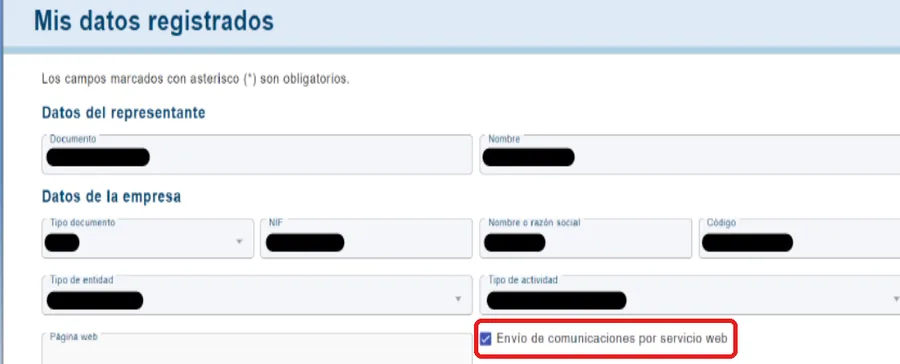 Tap to enlarge (opens in a new tab)
 - If it isn't ticked, tick it and click “Guardar” at the bottom of the page.
Without this checkbox, CheckInSecure cannot send your communications to SES. The official guide only shows the checkbox already ticked and doesn't describe how to enable it: “tick and save” is what the screen itself suggests (“Consulta y modificación de mis datos”), not a procedure documented by the Ministry. If you can't see it or can't save it, write to SES or to us.
Technical questions about SES.Hospedajes (contact given by the Ministry in its FAQ): ses.hospedajes@interior.es
Where do I find my Web Service username?
How to sign in. Open the official access, click “Acceso” under “Acceso al registro de establecimientos y entidades” and identify yourself with Cl@ve (Móvil or permanente) or DNIe / electronic certificate. This is not the “sin certificado” access, nor the Web Service password.
Go to the official access ↗ · Haven't registered yet? Go to “I'm new”
- In the panel, click “Credenciales” (“Servicio de comunicación” card).
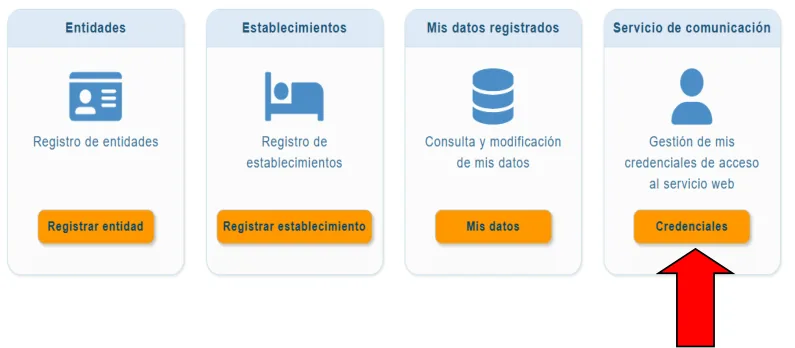 Tap to enlarge (opens in a new tab)
 - If you have several entities, pick yours in the drop-down.
- Under “Datos del usuario”, the “Usuario” field is your Web Service username.
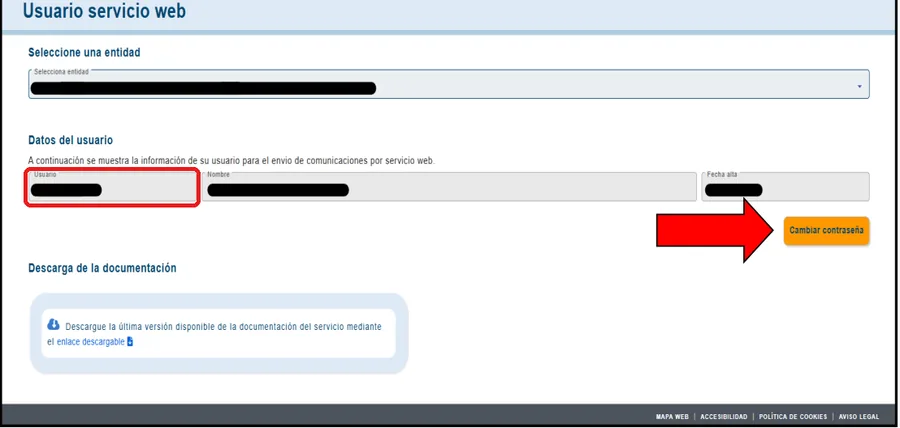 Tap to enlarge (opens in a new tab)
Copy it exactly as SES shows it and paste it into “Web Service username” in your SES Profile in CheckInSecure. Don't guess it or type it from memory.
How do I recover or change my Web Service password?
How to sign in. Open the official access, click “Acceso” under “Acceso al registro de establecimientos y entidades” and identify yourself with Cl@ve (Móvil or permanente) or DNIe / electronic certificate. This is not the “sin certificado” access, nor the Web Service password.
Go to the official access ↗ · Haven't registered yet? Go to “I'm new”
- In the panel, click “Credenciales” and, if you have several entities, pick yours.Tap to enlarge (opens in a new tab)
- Click “Cambiar contraseña”, type the new one twice (at least 8 characters, with an uppercase letter, a lowercase letter and a digit) and click “Guardar”. SES will answer “¡Contraseña cambiada!”.Tap to enlarge (opens in a new tab)
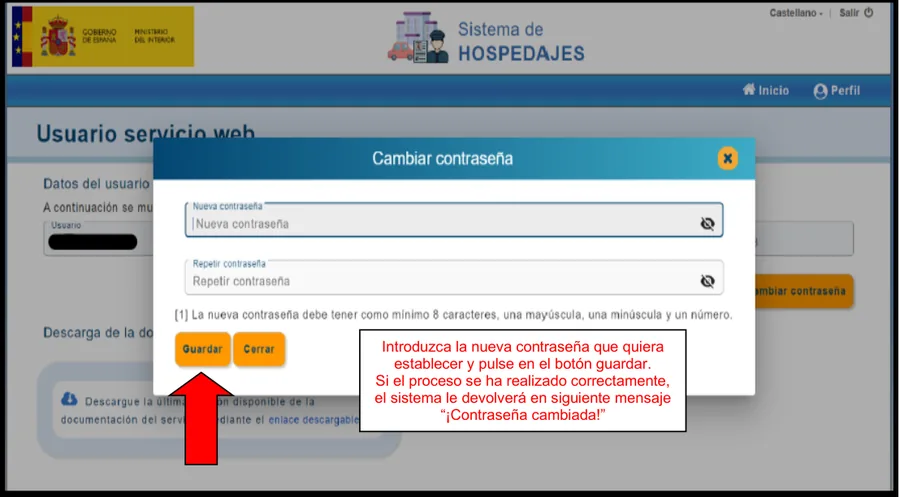 Tap to enlarge (opens in a new tab)
SES doesn't show the current password: if you don't remember it, set a new one. If another program (a PMS, a channel manager…) already uses that Web Service username, changing the password will affect it too: update it there as well.
This is not the password you use to sign in to the platform (the “sin certificado” access). If you forgot that one, the sign-in screen has “He olvidado la contraseña y deseo recordarla” (it asks for your document number and email).
Where do I find my landlord code?
How to sign in. Open the official access, click “Acceso” under “Acceso al registro de establecimientos y entidades” and identify yourself with Cl@ve (Móvil or permanente) or DNIe / electronic certificate. This is not the “sin certificado” access, nor the Web Service password.
Go to the official access ↗ · Haven't registered yet? Go to “I'm new”
- In the panel, click “Mis datos”.Tap to enlarge (opens in a new tab)
- Under “Datos de la empresa”, copy the “Código” field.
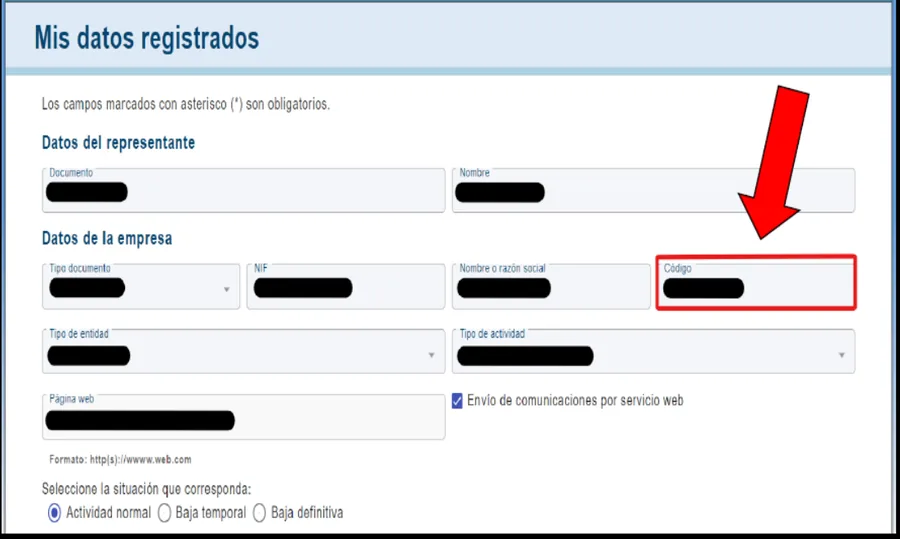 Tap to enlarge (opens in a new tab)
It's the “Landlord code” CheckInSecure asks for in your SES Profile.
Where do I find my property's code?
How to sign in. Open the official access, click “Acceso” under “Acceso al registro de establecimientos y entidades” and identify yourself with Cl@ve (Móvil or permanente) or DNIe / electronic certificate. This is not the “sin certificado” access, nor the Web Service password.
Go to the official access ↗ · Haven't registered yet? Go to “I'm new”
- In the panel, click “Mis datos” and scroll down to “Lista de establecimientos”.Tap to enlarge (opens in a new tab)
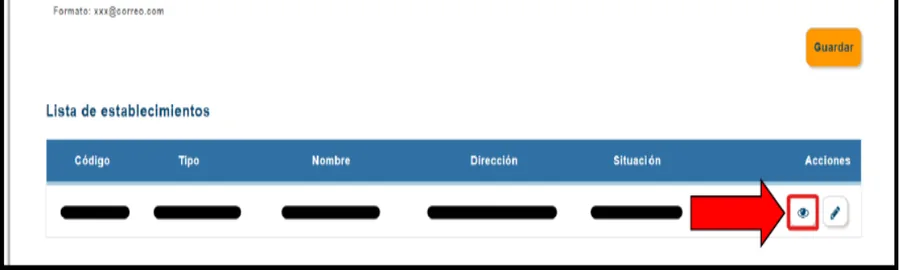 Tap to enlarge (opens in a new tab)
 - Click the eye icon of the property you want to connect. In “Ver establecimiento”, copy the “Código” field.
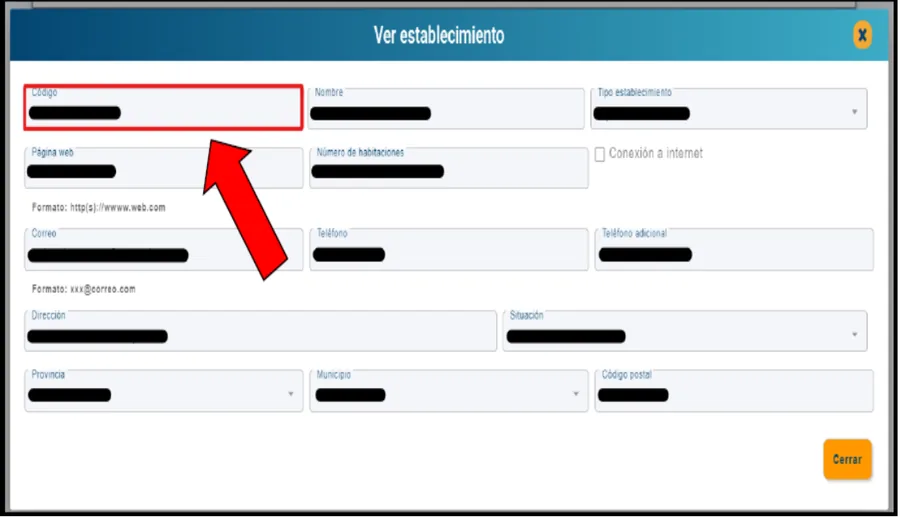 Tap to enlarge (opens in a new tab)
Each property has its own code. If you have several, check the name and address and pick the one for THAT property (the code also appears in the first column of the list). Paste it into “SES establishment code” for that property in CheckInSecure.
When you have the data
Enter it in CheckInSecure: in your SES Profile (landlord code, Web Service username and password) and, in each property, its establishment code. Then click “Save and check connection”.